
Blogs

A new feature called Dynamic Templates was introduced in AEM 6.2. This feature is also known as Editable Templates in AEM for the obvious reason that these templates can be created and edited at any time.
Generally, the control of creating and structuring templates is given to more specialized author groups called “Template Authors”.
The diagram below depicts the requirements to create a content page.
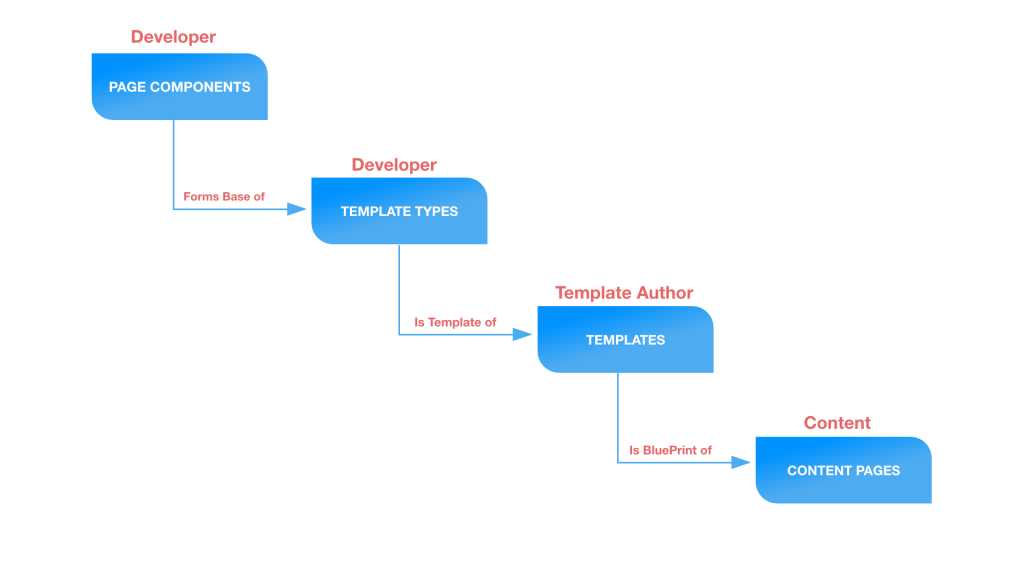
In order to fulfil these requirements, the collaboration of roles below is important:
1. Developer concentrates on development of page components and template types and provides necessary information to template author.
2. Template Author is responsible for creating templates using template types, configuring use of components on templates.
3. Content Author is responsible for creating and editing content pages using templates.
Dynamic templates provide tremendous capabilities and flexibility in configuring templates:
- Rather than developers, template authors can create and edit templates.
- Provides template authors with touch optimized UI “Template Console” for managing the lifecycle of templates and “Template Editor” to configure templates.
- For any page a content author creates using a dynamic template, template authors need to configure three parts of the template:
Structure: Define components and content for template
Initial Content: Define content visible on page when it is first created
Policies: Define design properties of a component - Dynamic connection is maintained between the page and template, modification in structure will reflect on all pages created using the template, whereas modification in initial content is reflected only on the new pages created using the template.
- All the dynamic templates are stored under /conf
- Design mode is not offered on pages created using dynamic templates. This can be achieved by creating component policies in template editor.
- Provides concept of Page Policy to define specific client-side libraries to be loaded on each template.
Let’s jump into implementation and see how to create dynamic templates in AEM.
Step 1: Activate Editable Templates in your project
With editable templates, templates are stored under /conf. In order to create project specific template hierarchy under conf, we can use configuration browser.
- Navigate to Tools > Configuration Browser
- Click on Create
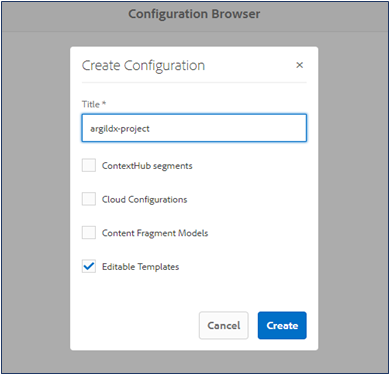
3. On Create Configuration dialog, configure:
- Title: Enter title with your project name
- Editable Templates: Check this option
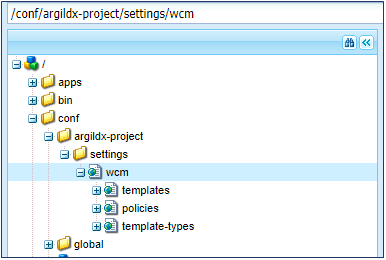
4. You can see below generated template structure on CRXDE:
Step 2: Create a new Page Component
- Open CRXDE Lite User interface : http://<host>:<port>/crx/de/index.jsp
- Navigate to page components folder of your project
- Create a new page component with following details:
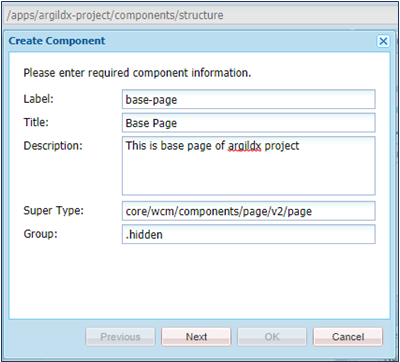
Rename base-page.jsp created below base-page component to base-page.html
Step 3: Next step is to create template type
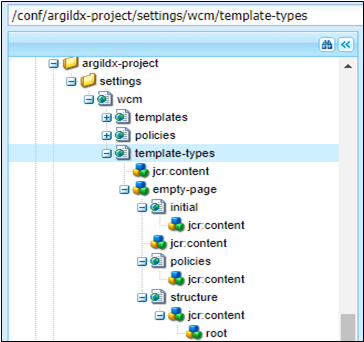
- Navigate to /conf/argildx-project/settings/wcm/template-types
- Create a node with name “empty-page” and Type “cq:Template”

3. Create jcr:content node under empty-page with below properties
 <jcr:content
        jcr:primaryType="cq:PageContent"
        jcr:description="ArgilDX Empty Template for generic pages"
        jcr:title="ArgilDX Empty Page"/>
4. Create initial node of type cq:Page under empty page
5. Create jcr:content node under initial with below properties
 <jcr:content
        jcr:primaryType="cq:PageContent"
        sling:resourceType="argildx-project/components/structure/base-page"/>
</jcr:content>
6. Create policies node of type cq:Page under empty page
7. Create jcr:content node under policies with below properties
 <jcr:content
        jcr:primaryType="nt:unstructured"
        sling:resourceType="wcm/core/components/policies/mappings">
</jcr:content>
8. Create structure node of type cq:Page under empty page
9. Create jcr:content node under structure with below properties
 jcr:content
    cq:deviceGroups="[mobile/groups/responsive]"
    jcr:primaryType="cq:PageContent"
    sling:resourceType="argildx-project/components/structure/base-page">
    <root
        jcr:primaryType="nt:unstructured"
        sling:resourceType="wcm/foundation/components/responsivegrid"/>
</jcr:content>
Template type is all set and hierarchy should look as shown below.
Step 4: Now template authors can go ahead and create templates using template type
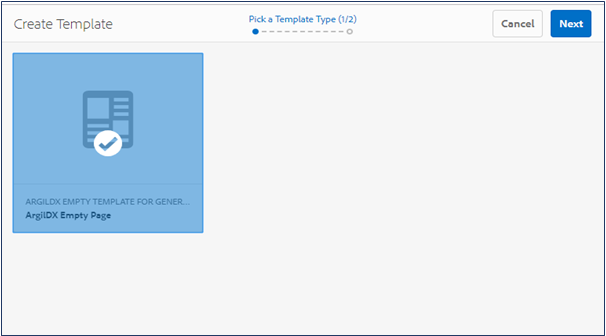
- Go to Tools > Templates > Go to your project(argildx-project) > Click on create from Toolbar
- You can see created ArgilDX Empty Page template type. Select this Template Type and click on Next
4. Provide suitable Title and Description and Click on Create.
5. Click on Open from confirmation dialog to view the template.
6. Template contains layout container to drag and drop components as shown below:
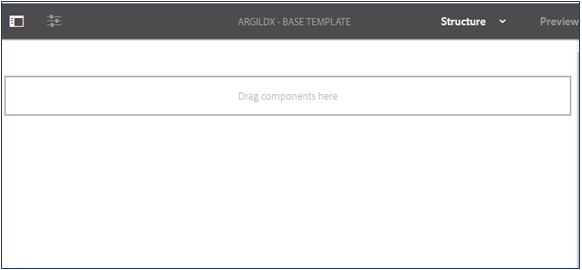
Note: This layout container is picked from structure node (wcm/foundation/components/responsivegrid) of template. For your custom page component to pick components from structure node, add below code in the body of your page component.
 <sly data-sly-use.templatedContainer="com.day.cq.wcm.foundation.TemplatedContainer"
       data-sly-repeat.child="${templatedContainer.structureResources}"
data-sly-resource="${child.path @ resourceType=child.resourceType, decorationTagName='div'}"/> Note: Add below code in the head section of your page component to enable tab view of components in structure mode when layout container is unlocked:
 <head data-sly-use.clientlib="/libs/granite/sightly/templates/clientlib.html">
<sly data-sly-                  call="${clientlib.all@categories='wcm.foundation.components.parsys.allowedcomponents'}"/>
</head>
Step 5: Working with templates
There are three parts to be built in each template:
- Policies define design properties of a component i.e. allowed components and its design.
- Initial defines default components and content to be available when a page is first created using this template.
- Structure defines the structure of a template.
5.1) Template Policies
When a page is created using dynamic templates, content authors will not have design mode in page editor. Now template author defines content policies in template editor to persist the design properties of components.
There are two types of policies which we can define:
a. Template Level Policy (Page Policy):
– It allows template authors to define specific client libraries to be loaded on each template, it reduces unnecessary calls to libraries.
– Template author has control to add or remove client libraries rather than developers.
Let’s check out how we can make use of it:
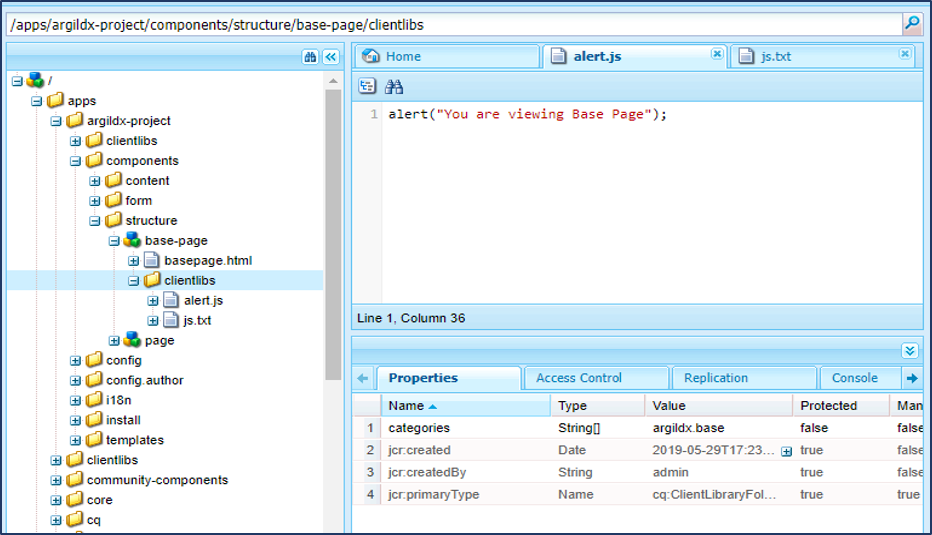
- Create a client library folder with name clientlibs (can use any name) of type cq:ClientLibrary under page component with unique categories value defined.
- Add required client-side libraries to be loaded on base page.
3. Now we have to apply Page Policy on the new template created.
4. Open newly created template.
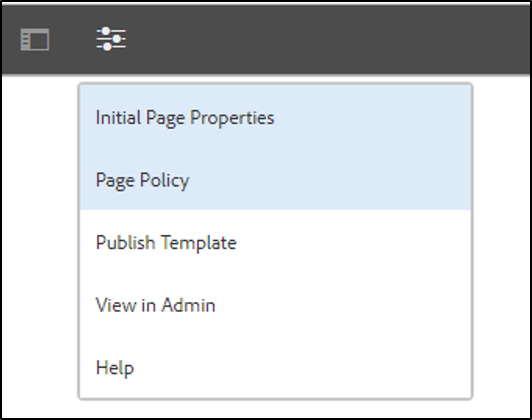
5. Click on Toggle button on toolbar and Click on Page Policy
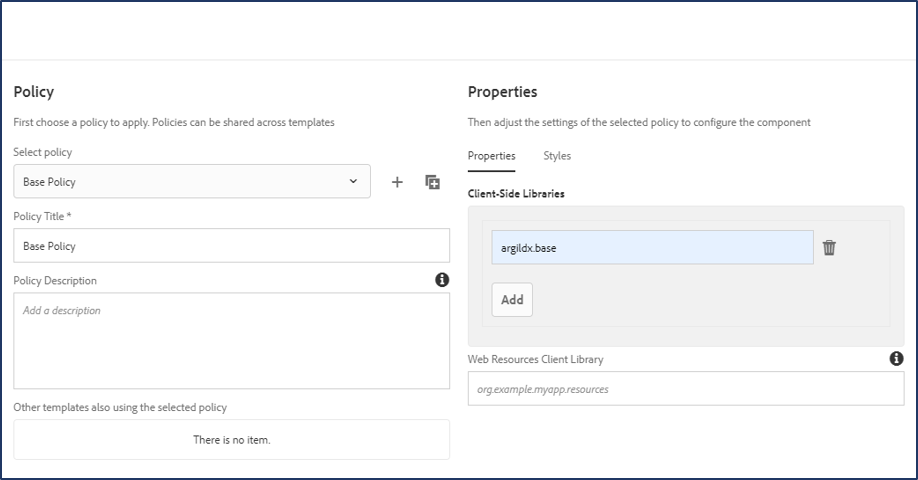
6. On the left side Policy Dialog, we have
– Select Policy to select any existing policy.
– In Policy Title, provide title Base Policy
7. On the right-side, Properties dialog we have
– Client-Side Libraries field, add the categories name defined in the properties of the clientLib created in step 1, i.e argildx.base
– Click on submit
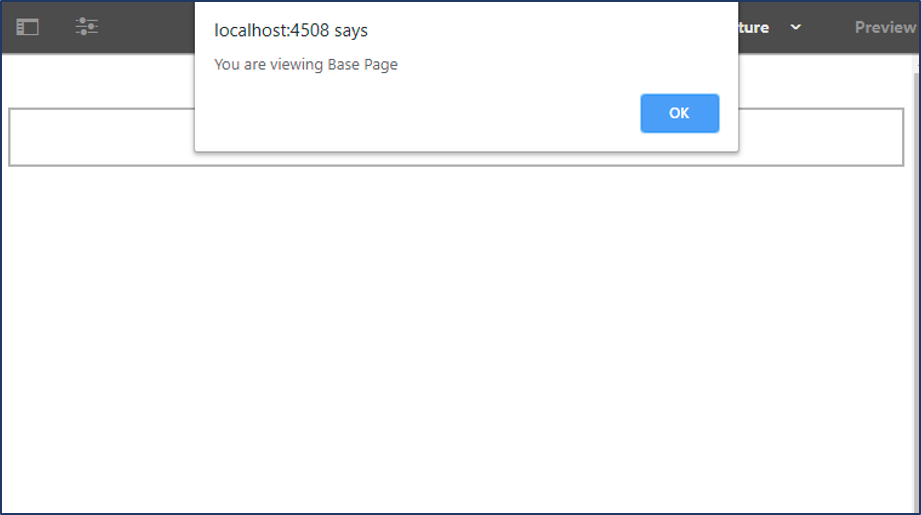
8. On Submit, you can see that an alert message pops up on template which was added in the alert.js file of clientlib(argildx.base)
Note: For your custom page component to pick template level policies, add below code in the head section of your page component (base-page.html)
<head data-sly-use.clientlib="/libs/granite/sightly/templates/clientlib.html">
    <sly data-sly-test.clientlibCategories="${currentStyle['clientlibs']}"
         data-sly-call="${clientlib.all @ categories = clientlibCategories}"></sly>
</head>
b. Component Level Policy
– It allows authors to define design properties for each parsys.
– To add policies on components using design dialog.
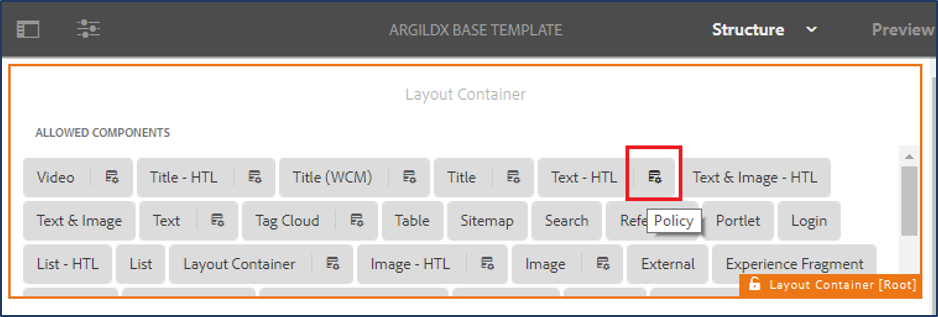
Let’s configure Policy on layout container:
1. On the Template, select the layout container and click on policy toolbar action shown below:
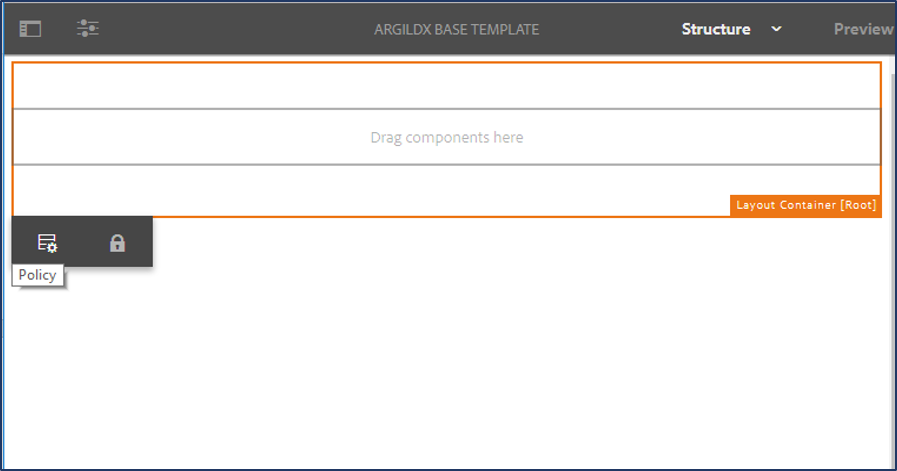
2. On the left side Policy Dialog, we have
– Select Policy to select any existing policy.
– In Policy Title, provide any suitable title. Ex: General group
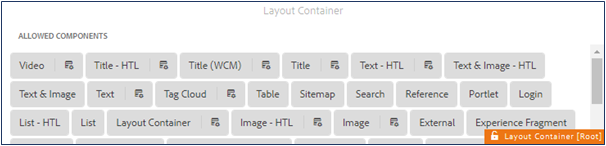
3. On the left side Properties Dialog, we have
– Allowed Components which has list of components and group that can be selected to be made available on selected layout container
– Select any group (General)
4. Click on submit
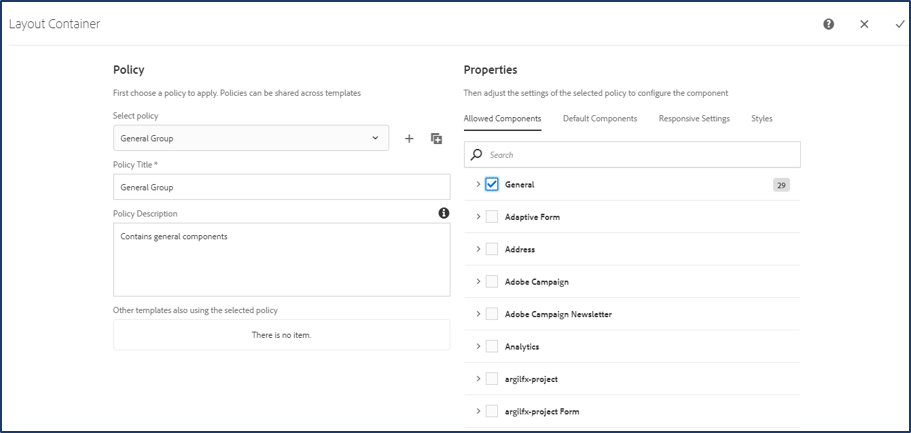
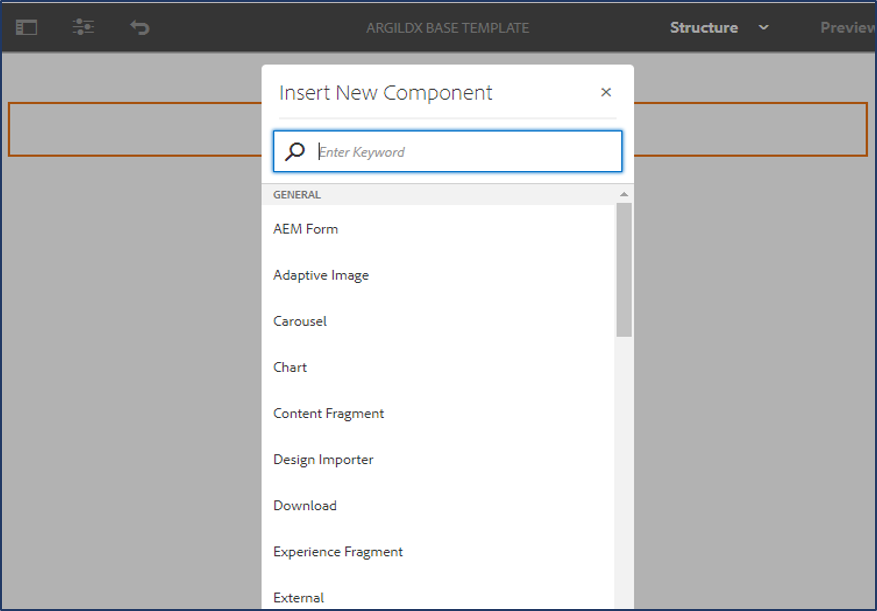
5. Now you can see that selected group of components can be added in the layout container.
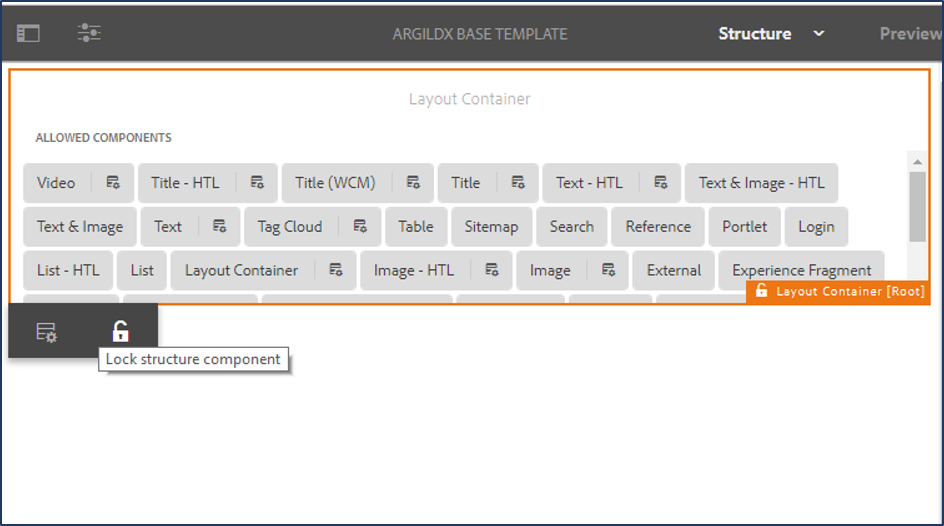
5.2) Lock/unlock Components:
1. Components can be locked/unlocked using Lock button next to policy button on toolbar. This feature defines whether content is available for modification in initial content mode.
2. Locked components remain in structure mode and can’t be edited on resulting pages.
3. Unlocked components will be available under initial content mode and can be edited on resulting pages.
Note: After pages are created using the template, if structure of same template is updated then these pages will be affected by changes.
5.3) Initial Content
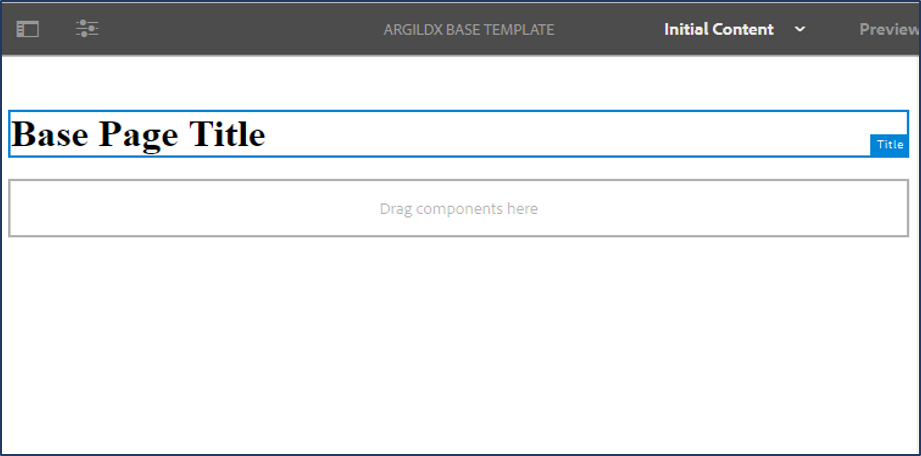
In this mode, define default components and content to be available when a page is first created using this template. Unlock the layout container available in structure mode to be able to configure it in initial content mode.
In the below example, I have added Title component and authored with title “Base Page Title”
Note: After pages are created using the template, if initial content of same template is updated then these pages will not be affected by changes.
5.4) Design Dialog for components at Template Level
Configurations with design dialog of a component can be edited by clicking on policy as shown in below diagram:
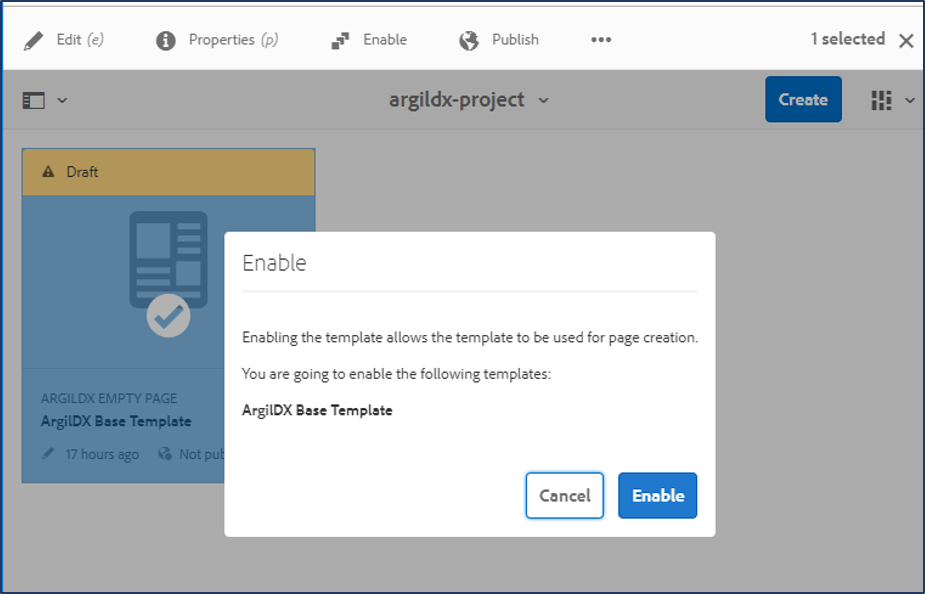
Step 6: Enable Template from Console
Finally, once template is ready to be used for creating pages:
1. Select newly created ArgilDX Base Template from Template Console
2. Click on Enable from toolbar.
3. Click on Enable button from confirmation window.
Note: In case a template is marked as disabled after creating some pages with it, then existing pages remain unaffected. However, the template will no longer be available for creating new pages until it is enabled again.
Step 7: Once Enabled, Publish Template
1. Select newly created ArgilDX Base Template from Template Console
2. Click on Publish from the toolbar.
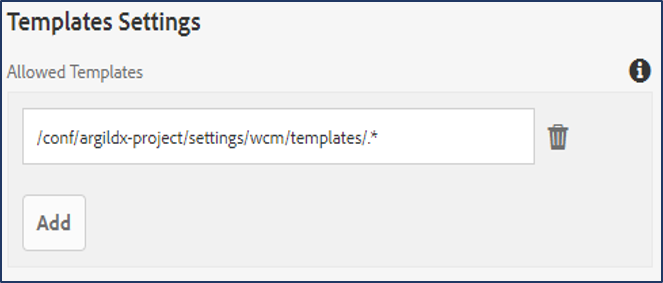
Step 8: All we must do is Allow Template under root page of our website to use it
1. Open page properties of root page of your website
2. Click on Advanced Tab
3. Under Template Settings, click on add to define Allowed Templates path
Eg: /conf/<your-folder>/settings/wcm/templates/.*
Now, you have successfully created templates and made it available for content authors to create pages.

January 28, 2020


Nice
There is a typo at the step where we are creating the jcr:content node for initial inside /conf. The content shown as jcr:content is for the policies and not for the initial cq:Page type.
Hi Himanshu
Thanks for pointing out the issue. We’re glad you took time to post about it.
We’ve now corrected the error. Please check and let us know if there’s anything else we can help you with regarding this topic or anything AEM related.